Understanding What Works in Flooring Transitions
By Bill Treiber
Having a basic understanding of the functions of the profiles will help you deliver the best solution for your next job. Photo: ast via iStock/Getty Images Plus.
Transitions have always been a part of any flooring job. The task of assigning the proper profiles has never been more daunting. The complexities of our flooring industry have grown to include every 1/16 or mm of an inch in thickness options alone. Having a basic understanding of the functions of the profiles will help you deliver the best solution for your next job. The big four: stair nose, square nose, T mold and reducer are all available in a wide variety of materials and designs. Knowing the method of install and the characteristics of the floor will get you started on the right path.
Let’s look at the concerns for each of the big four mentioned above:

Stair Nosing
Without a doubt, this is the leader in use and design statement. One needs to know the thickness of the installed floor to deliver the correct thickness for your stair nosing. Assuming the method of install could cause a call back or a misunderstanding from your customer on what they expected the stair nosing to look like. Many potential customers need to learn that most floating floors will require an overlapping profile. This can be a huge dissatisfier and potential tripping hazard for your client. Discuss with them their options after you have read the flooring manufacturer's guidelines.
Every stair nose has a bull nose. Confirm the shape of the bull nose as it will be the leading design feature for your floor. Distinguish the terminology used correctly. Calling a stair nosing “bull nosing” is like referencing your thumb when talking about your hand, its only one fifth of it. Here is a small sampling of different bull nose configurations when dealing with stair nosing:
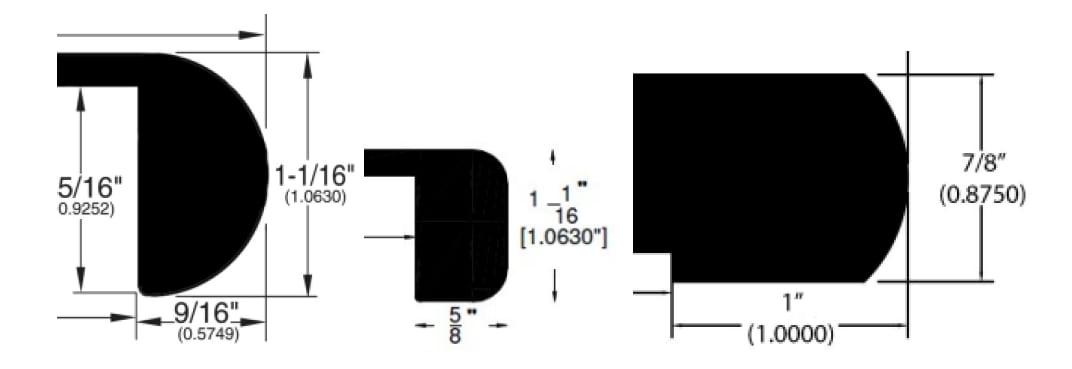
The first is a full radius round bullnose – the middle one is a 4 mm radius square edge, and the right one is referred to as a rounded bull nose. The bull noses shown above are each different and need to be clearly identifiable to your customers. The girth or overhang of the bull nose is also critical to the method of installation required. The overhang size should also be understood by the end user. That refers to the girth of the bull nosing.
Next, know the face thickness as they will vary from just a couple of mms to 3/4" thicknesses. For overlapping stair nosing the thinner, generally the better. For flush stair nosings, the more options available, the better.
The thickness portion of the stair nose correlating to the floor thickness is called the face. Generally, the face matches the thickness of your “installed” floor and is the main body of the stair nose. Remember that adhesives are most common when installing a stair nose and will increase the overall height of the face and profile.
Recognize overlapping stair noses and the size of the lip. The lip is the extended portion on the edge of the face. A minimum of 1/2" lip should be sufficient to allow for expansion or contraction of the floor without creating any visible gaps. Here are a couple of overlapping stair noses:
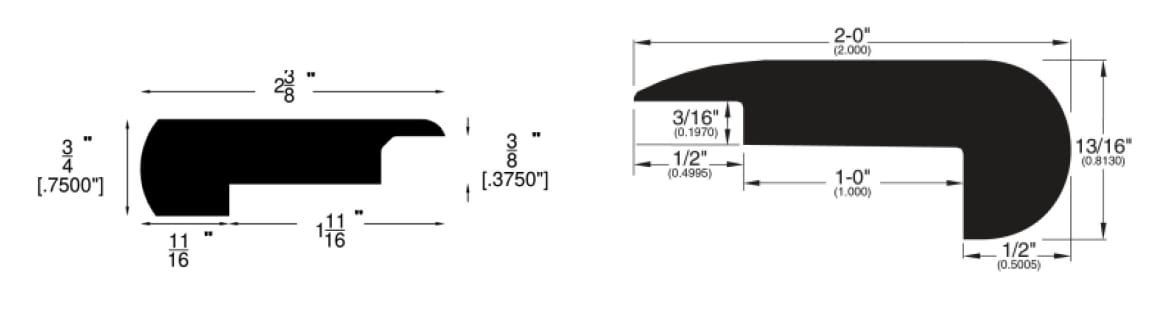
The one on the left is designed for floors 3/8" in thickness and has a 1/2" lip. The right stair nose has a 1/2" lip and is designed for floors 3/16" in maximum thickness. Other names defined in the stair nosing categories often refer to “landing treads," generally known as large, 5"-wide, solid wood stair nosing. Engineered stair nosings are becoming more popular in the flooring industry. Know that face thicknesses and bullnose girth and thicknesses are generally running smaller due to trends in the industry. Other trends in the industry’s growth have created so many different sized floors and tongue locations that manufacturers of accessories have had to become more generic in design. So, ask questions before ordering your next stair nosing. Your better understanding will create a more informed customer and likewise a happier one too.
Square Nosing
Often referred to as an end cap, it can be easily recognized as an overlapping 90-degree edge defining the border of a particular surface. The base of a square nose should always be mounted to the subfloor and not a neighboring floor surface unless that floor surface will not move. Also, the base should always be installed onto the lower height floor. If that floor is carpet, then leaving room for a direct base glue down is critical. Like other overlapping profiles, square nosings are made to accommodate various floor thicknesses.
Although the primary function of a square nose is to allow the floor expansion or contraction space, most square nose is used to complete or give the floor a finished look. Hiding irregular cut lines or rough-cut material is also critical for protection of the floor's edges.
There are four rules to follow when installing square nosing:
1. Never install the lip or overlapping portion of the profile over a soft surface like carpet.
2. Always anticipate the height of the profile's lip, so when installed, it rests on the hard surface floor.
3. Always adhere only the base of the profile to a solid subfloor surface.
4. To maintain ADA compliance: Never exceed a 1/4" rise above the floor height on the perpendicular edge.
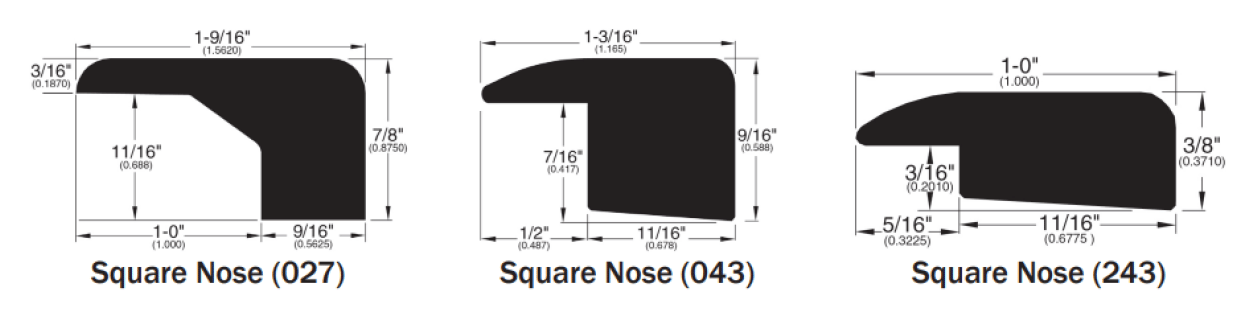
Here are a couple of examples of square nosing profiles: (Notice the angles at the bottom of the bases made to accommodate various floor heights.)
A final note on the square nose from an installation point of view: Always secure the profile with adhesive rather than mechanical fasteners. This will eliminate any cracking or splitting and/or touch up requirements down the road or at time of install.
T Molds
T Molds are always going to be important to the flooring industry. Its primary function like the square nosing is to protect the edges of the floor’s surface and allow for expansion and contraction. While often misused as a reducer, both surfaces the T Mold is installed over should be of equal height. Also, long lines of expansion can often require a preference for track to be used in the installation. This is particularly common in commercial jobs or larger scale projects. Just remember to leave or create a large enough base width for both the track's and the floor's expansion or contraction.
Lip widths should not run less than 1/2" and can be as large as 1". These examples of T molds show the different floor height adaptations:

'Curved T molds are trending with today’s modern design features. Know your product's limitations as anything curved will command more waste and cost a great deal more when all is completed and finished.
Reducers
Designed to create a safe environment, reducers are critical to the safety of the floor's function. Based on code compliances with the ADA, reducers are trending wider with more gradual inclines. Like the other profiles, overlapping versions are available. The best reducers complete the following criteria:
1. Can handle heavy traffic without experiencing damage.
2. Seldom noticed and well-coordinated with the neighboring floors.
3. Allows the floor to perform according to manufacturer’s specifications.
4. Leaves no sudden drop or rise next to the profile's edge.
5. Always installed where two different hard surface floors are butted up next to one another.
Examples of various reducers are shown below:

The first one on the left is clearly an overlapping reducer designed for thin floors under 6mm thick. Don’t be fooled by the two profiles to the right, they are designed as flush reducers for glue down and/or nail down applications. The so-called lip is not a lip at all but a top groove designed to accommodate several different off-setting tongues with tongue and groove floors.
The next time you plan for a completed job and transitions are involved, remember this basic product knowledge and information. You’ll make all involved much happier.
Bill Treiber is the technical sales and education manager for Artistic Finishes, a member-based provider of premium hardwood millwork and accessories since 1995.
